Recent Posts

Wednesday, December 7, 2011

Hand-Stamped Personalized Jewelry

I have recently started making personalized hand-stamped jewelry. I originally did it just for myself. I always wanted one of those 'mommy' necklaces and I knew my husband would never think to buy one, so I went ahead and figured out how I could make one for myself. One thing led to another and I was soon making them for friends and family as well. Many of them have been gifts for new moms...which usually so appreciated the recipients ends up in tears (tears of joy, of course)!

With all of the recent excitement about my hand-stamped jewelry, I am going to be attending and selling my jewelry at my first craft fair. The craft fair will be held this Thursday, December 8th from 6:30-8:30pm at Thoreau Elementary in Kirkland. So stop on by and pay me a visit. I'd love to see you!


*Necklace Info:
All tags are silver plated pewter
All charns are swarkovski crystal
Each necklace includes a 16" or 24" chain
The size of font stamped on the tag will be primarily determined by the number of letters needed.
If you would like a price sheet. Email me and I can get you more information!
All shipping costs are the responsibilty of the buyer.

Tuesday, December 6, 2011

Other Recent Projects...

Although I haven't been working on very much cake the last few months, I have been working on some other crafty-type of projects. I thought maybe I'd share some of them here, more as a justification to myself of where the time has gone the last few months than because you all are the most loyal blog readers ever. :)

So, here they are...

Cocktail Umbrella Door Wreath

This was the easiest project ever. I bought a Styrofoam wreath form from Michaels and found a huge box of cocktail umbrellas at Cash N Carry. Both of these item were extremely inexpensive, around $5. Then, it was as easy as opening up the umbrellas and sticking them into the wreath so that all of the little umbrellas overlapped just a little. Easy, peasey!


Thank You cards from Anna's Birthday

These were a tad difficult with a wiggley three year old, but she was a trooper and stuck it out for around 30 of these cute cards. We painted the palm of her hard and her three middle fingers (because she turned 3) different colors and then pressed her hand onto white paper to make an impression. It was a little difficult to figure out the best way to do this without making a bunch of smears all over the paper, but after a few practice tries we figured it out. After the main portion dried I added the details and glued the pieces onto pink cards. I love how personal this project turned out so much I had to make an extra one for myself.


R2-D2 Painting for Austin's Star Wars room

We have re-done Austin's bedroom in a Star Wars theme. He has a lot of empty wall space and we were struggling with how to fill it. We really couldn't find any wall decorations that seemed right or appropriate. So, when in doubt, I make my own. I got this large canvas (2'x3') and painted it a navy blue. Then I went online and found a R2-D2 coloring page that I liked. I wanted the design to be simple and consist of just drawn lines. I scanned and enlarged the picture and then using transfer paper, sketched the deign onto the canvas. After that, I took a white paint pen and painted in the transfered lines. I think he is awesome. One of my favorite home projects yet.


Halloween Door Wreath

Also, a super duper easy wreath. I bought another Styrofoam wreath from the Michaels and then checked their dollar bin for all the Halloween type ribbon I could find. I just cut all of the d ribbon peices the same size and then tied them around the wreath, tying a knot on the outside. The peices of ribbon overlapped a bit so that you couldn't see the foam of the wreath. And that is all it took. It was so easy that I think I meed to make some more for different holidays.


Paint Chip Art

We have one huge wall in our living room that really needed some sprucing up. We have been looking for a peice of art to put there for a couple of years but have never found anything we like that is either big enough or is in our price range. I came accross this idea online and realized that it was a perfect fit for our space.

I went to Home Depot and bought one huge peice of MDF whihc they cut for me into three peices (2 peices measure 2'x3' and the third 3'x3'). After that, Anna and I took many trips to the Homoe Depot in order to aquire that mass amount of paint chips we needed to complete our project. Once we had enough paint chips, I cut them down to measure 3"x3". I spray painted all of the edges of the MDF a dark brown, shuffled the paint chips as best I could and used a spray adhesive to fix the chips to the board. After all the piant chips were secure, I painted Modge Podge over the entire thing. Lastly, I bought some dark brown stain and wiped it over the entire surface until it looked just a little distressed.

In this picture the boards are resting on our kitchen overhang. We plan on actually hanging them a few inches higher on the wall when we get the chance.


So, that's whaat I've been up to. Here's to more crafting soon!

Black Forest Cupcakes

My husband's favorite cake is Black Forest Cake, and more specifically Black Forest Cake from Safeway *gasp*, I know. I have tried for many years to make an exact replica of his favorite cake,but I always get suckered into some Martha Stewart-type fancy recipe that turns out ok but is not exactly what he wants. This year I brought out the big guns...chocolate box cake, canned cherry pie filling and homemade whipped cream. And, with a few chocolate curls I found in the back of the pantry to top it off, they were perfect!


Snickerdoodle Cake

I found this recipe online and thought it looked really promising...and man, did it deliver. Think of all the things you love about a snikerdoodle cookie and then make it even better by putting them all into a cake.

The cake was like and fluffy with just enough hints of vanilla and cinnamon, but the buttercream is what really stole the show. the buttercream actually has that little but of sugar "crunch" to it, just like the snikerdoodle cookie.

I love this cake and plan on making it again very soon.


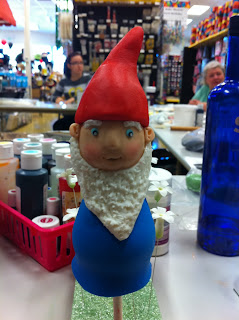
The Gnome...

I meet with a group of fabulous ladies once a week to work on different gumpaste flowers...well, at least it started out that way. I started the group with the intention of learning to make all kinds of beautiful gumpaste flowers, but while the rest of the group has tried stephanotis, roses, peonies, hydrangeas, ect. I found I prefer to make little gumpaste people.

So, when I showed up for group and one of my friend says she is working on a Caddy Shack cake and wants to have a gnome popping out of the cake, but she doesn't know where to start, I volunteer to do it for her because I would much rather do that than try and catch up on the flower everyone else is learning to make.

I know he isn't finished. He still needs his arms and hands, but I think he is super cute and I am kind of sad I can't keep him to myself!


Halloween Cake Pops

I broke down. I broke down and bought a cake pop maker. I know. I know. What was I thinking?!

Turns out I was thinking that this thing is pretty cool. I used a box cake the first time I tried it, just to see how it worked, and it made over 75 little perfectly shaped ckae balls. And the best part is that it made each dozen in about 3 min. The baking is extremely quick, but it is the decorating that can make this project more time consuming.

Cake pops are a great project to do with kids. Austin and I had a great time making these halloween cake pops. He especially like the mummies...and they tasted great too!


Mini Purse Cakes

I have wanted to make these mini cakes for a very long time. I think they turned out pretty cute and can't wait to make more of them soon.

These cakes are individual serving and were vanilla pound cake with vanila buttercream.


Anna's 3rd Birthday - A Mermaid Party

WARNING: Longest. Post. Ever.


It has taken me so long to write this post that I am embarrassed. I worked really hard on this party for my sweet girl and it turned out so great that it really deserved a prompt posting, but life as it is, sadly it did not.

So, better late than never, here is goes...

My my sweet little Anna had decided that she wanted a Little Mermaid party to celebrate her 3rd birthday...and since mommy is a fan of the Little Mermaid as well, it seemed as go of an idea as any. (So what, that I had a Little Mermaid poster next to bed in my college dorm room. There is nothing wrong with that.)

As I do with any party, design and themes started with the cake, but I'll get to that later. And, as I am not one to but the themed party goods from the party store (not that there is anything wrong with that), I choose to create most of my own decorations and such.

First, I found a cute turquoise tutu type skirt at the Gymboree. The tulle was stitched on to look like waves. Perfect! I found a plain white t-shirt and attached some beads to the neckline. Then I came across this headband at Fred Meyer glued on a few of the matching bead from the t-shirt and... Viola! Mermaid party outfit!


I found and bought the graphics for the invites and printables online. I had my tech savvy husband ad the colors to match what I wanted and just printed them on our color printer.


Then I started from the outside in. I made this cute 'Mermaids' sign and put it along the walkway to our house. Our Nana happened to have A TON of cool shells and they ended up not only with this sign but all over our party.


I also made this awesome sea inspired wreath for the front door.


If you have ever wanted to cover an entire room in something resembling seaweed then I have found and answer. I took two colors of green crepe paper streamers and ran though my sewing machine on the longest stitch. This ruffled the streamers and I ended up with more ruffly seaweed than I knew what to do with. I was easy, cheap, and I wish I had gotten a better picture of the room for reference. I also printed huge fish from the mermaid graphics set and taped them to the walls as well.


I used our printer and the mermaid graphics to make this sparkly 'Happy Birthday' pennant banner.


More decorations included a huge ship (just like Prince Eric's), lots of shells, framed pictures of Ariel,and a Snarfeblast to name a few. There was even a Dinglehopper in the bathroom!


We also had a huge gold treasure chest filled with sea star wands for the girls and golden tridents for the boys. The tridents were actually red pitchforks from the Halloween section at the party store that I spray painted gold. The treasure chest was also filled with tons of costume jewelry pearl and bead necklaces for the kids to wear.


Melanie and her wand!


I even used the mermaid printables to make water bottle labels and stickers for our goldfish snacks.


I also made some chocolate shells and happy clam cookies for snacking during the party.


Anna made absolutely sure that we were having a pinata at her party. So, I bought a tinkerbell pinata at the dollar store and peeled off the tinkerbell decorations. I used some poster board, glitter, and our printable mermaid to make the pinata match out theme.


The party gift bags were castle shaped beach pails with rock candy, salt water taffy, bubbles, flower bracelets, bead necklaces and rubber ducks. Topped off with a mermaid graphic "thank you" tag of course.


The cake had to be my most favorite part of this party..but let's not kid ourselves, when is it not my most favorite part. But this cake I am especially proud of. I made every aspect of this cake and it is entirely edible. I even sculpted the mermaid from gumpaste myself!


Anna & Slugger (apparently it tasted good too!)


Anna had a great time at the party. Thanks to everyone who helped make it so great!


Rice Krispy Treat Cupcakes

Awesome idea! And great fun to do with the kids. Rice Krispy treats are always an easy kid-friendly activity and letting them press the mess directly into the cupcake tin was an added bonus for them. Top this with frosting and sprinkles = kid perfection!


Happy Birthday to me...

The hubby and the kiddos made me a cake for my birthday complete with a crunchy sprinkle crust. I love my family!


'Apple for Teacher' Cupcakes

I made these cute apple cupcakes for the fabulous teachers at Talbot Hill. How did I get so much ed frosting on top of those cupcakes? I topped the cupcake with a mini donut and then frosted around it of course!


Lexi's Princess Cupcakes

Pretty princess cupcakes for little Lexi's first birthday!


Tiffany Ring Box Cakes

Cute Tiffany Ring Box cakes!

I made these for a great couple who were having a "breakfast at Tiffany's" style wedding. A friend of mine was attending their wedding and asked if I could make these cakes to have sent to their hotel room for the the night of the wedding.

These cakes were made to be individual serving and were red velvet with cream cheese buttercream.


Blue & Black Damask Cake

A birthday cake for a special girl!

Red Velvet cake with Cream Cheese Buttercream.


Pink Buggy Baby Shower Cake

I made this cake for a baby shower celebrating a new little girl! Chocolate cake with chocolate buttercream...a girl after my own heart.